

In 1906, Auguste Rodin sat in a hotel room in Marseille and drew a Cambodian princess he’d followed off a ship. He’d seen the Royal Ballet of Cambodia perform in Paris a few weeks earlier and was so struck by the dancers that he chased their tour south, filling notebook after notebook with rapid pencil and watercolour studies before they sailed home. He wasn’t trying to render costumes or faces. He was chasing movement, the kind that vanishes the moment you look down at the paper for too long. That instinct, catching the pose before it changes, is the whole idea behind gesture drawing. And most gesture drawing tips you’ll find online skip the part that actually matters.
What Gesture Drawing Actually Means
Gesture drawing is a quick, loose sketch that captures the pose, weight and direction of a figure rather than its details. Sessions usually run from thirty seconds to five minutes, and the point isn’t to finish a drawing. It’s to understand how a body moves and balances before your brain has time to overthink it.
The method owes a lot to Kimon Nicolaides, who taught at the Art Students League of New York after the First World War. His book, The Natural Way to Draw, wasn’t published until 1941, three years after he died of cancer at 47. A former student had to finish the manuscript from his notes. Nearly a century later, art schools still hand it to first-years, because his central idea, that you should draw the way a blind person would feel an object, still holds up.
The Gesture Drawing Tips That Actually Change Your Drawings
Search for gesture drawing tips and you’ll get dozens of lists that all say roughly the same five things. A few of them genuinely matter, though, so it’s worth separating those out.
Draw from your shoulder, not your wrist. A line pulled from a locked wrist comes out short and cautious. Swing your whole arm and the line has somewhere to go, which is why life drawing teachers keep telling students to stand at the easel instead of hunching over a desk.
Look for the line of action first: the single curve, usually a C or an S shape, that runs from the head through the spine and out to the trailing leg or arm. Almost no pose is built from straight lines. Even a soldier standing at attention has a slight lean somewhere. Find that curve before you touch anything else.
And put the eraser away. There’s no time to use one in a thirty-second pose anyway, but the habit matters more than the time limit does. If a line is wrong, draw the correct one next to it instead of rubbing it out. The “wrong” lines aren’t mistakes. They’re your reasoning, left visible on the page.
How Long Should a Gesture Drawing Take
This is the question beginners ask most, and it’s one that most gesture drawing tips answer badly by giving a single fixed number. The honest answer is that it depends what you’re training. Thirty-second poses strip everything back to a single gesture line, which is brutal but useful as a warm-up before a longer session. One-minute poses let you add the ribcage and pelvis as two connected masses. Two to five minutes is usually enough to rough in weight, proportion and maybe a hint of light and shadow.

Most people default to newsprint pads and a soft graphite pencil or a stick of vine charcoal, mainly because both are cheap and forgiving. Ink and brush pens work well too, and they take away the option of correcting anything, which some artists find sharpens their thinking rather than limiting it. Oil paint is the one material worth avoiding here, simply because it won’t dry fast enough to keep up with a one-minute clock.
A lot of artists now practise on a tablet instead, since apps built for digital sketching usually include a countdown timer and an auto-advancing image library, which does the same job as a life drawing session without needing a model in the room. It’s a reasonable substitute, though most people who’ve done both will tell you that drawing from a moving, breathing body still teaches you things a photo reference can’t, mainly because a live model shifts their weight in ways a still image never will.
The Mistakes That Keep Your Figures Stiff
The biggest one is drawing what you think a body looks like instead of what the pose in front of you is actually doing. Stick figures happen when beginners reach for straight lines because straight lines feel safer than curves. They’re not more accurate for it, though. They just look tidier while being wrong.
The second mistake is scrubbing at a line over and over while searching for the right placement. It feels productive, but it trains your eye to stay uncertain. Commit to a mark, look back at the model, and adjust with a fresh line rather than reworking the old one.
The third is treating every gesture drawing like a finished piece. It isn’t one. A pile of thirty scrappy one-minute sketches will teach you more than a single laboured ten-minute drawing you were too precious to mess up.
Building a Practice You’ll Actually Keep Up
You don’t need a life drawing class to start, though a weekly one helps enormously if there’s one near you. Free tools like Line of Action generate timed photo references of models in motion, which solves the biggest obstacle beginners face: finding a moving subject who won’t stand still for you.
Failing that, go and sit somewhere with people passing through: a train platform, a cafe, a park bench. You’ll lose most of your subjects halfway through the drawing, and that’s fine. Losing the pose and starting a new one is closer to real gesture drawing than a hired model holding still ever was.
Once movement stops being the main problem, the next thing worth studying is how you arrange a figure on the page at all, which is really a question of composition rather than anatomy. The two skills build on each other more than most beginners expect.
Why the Mess Is the Point
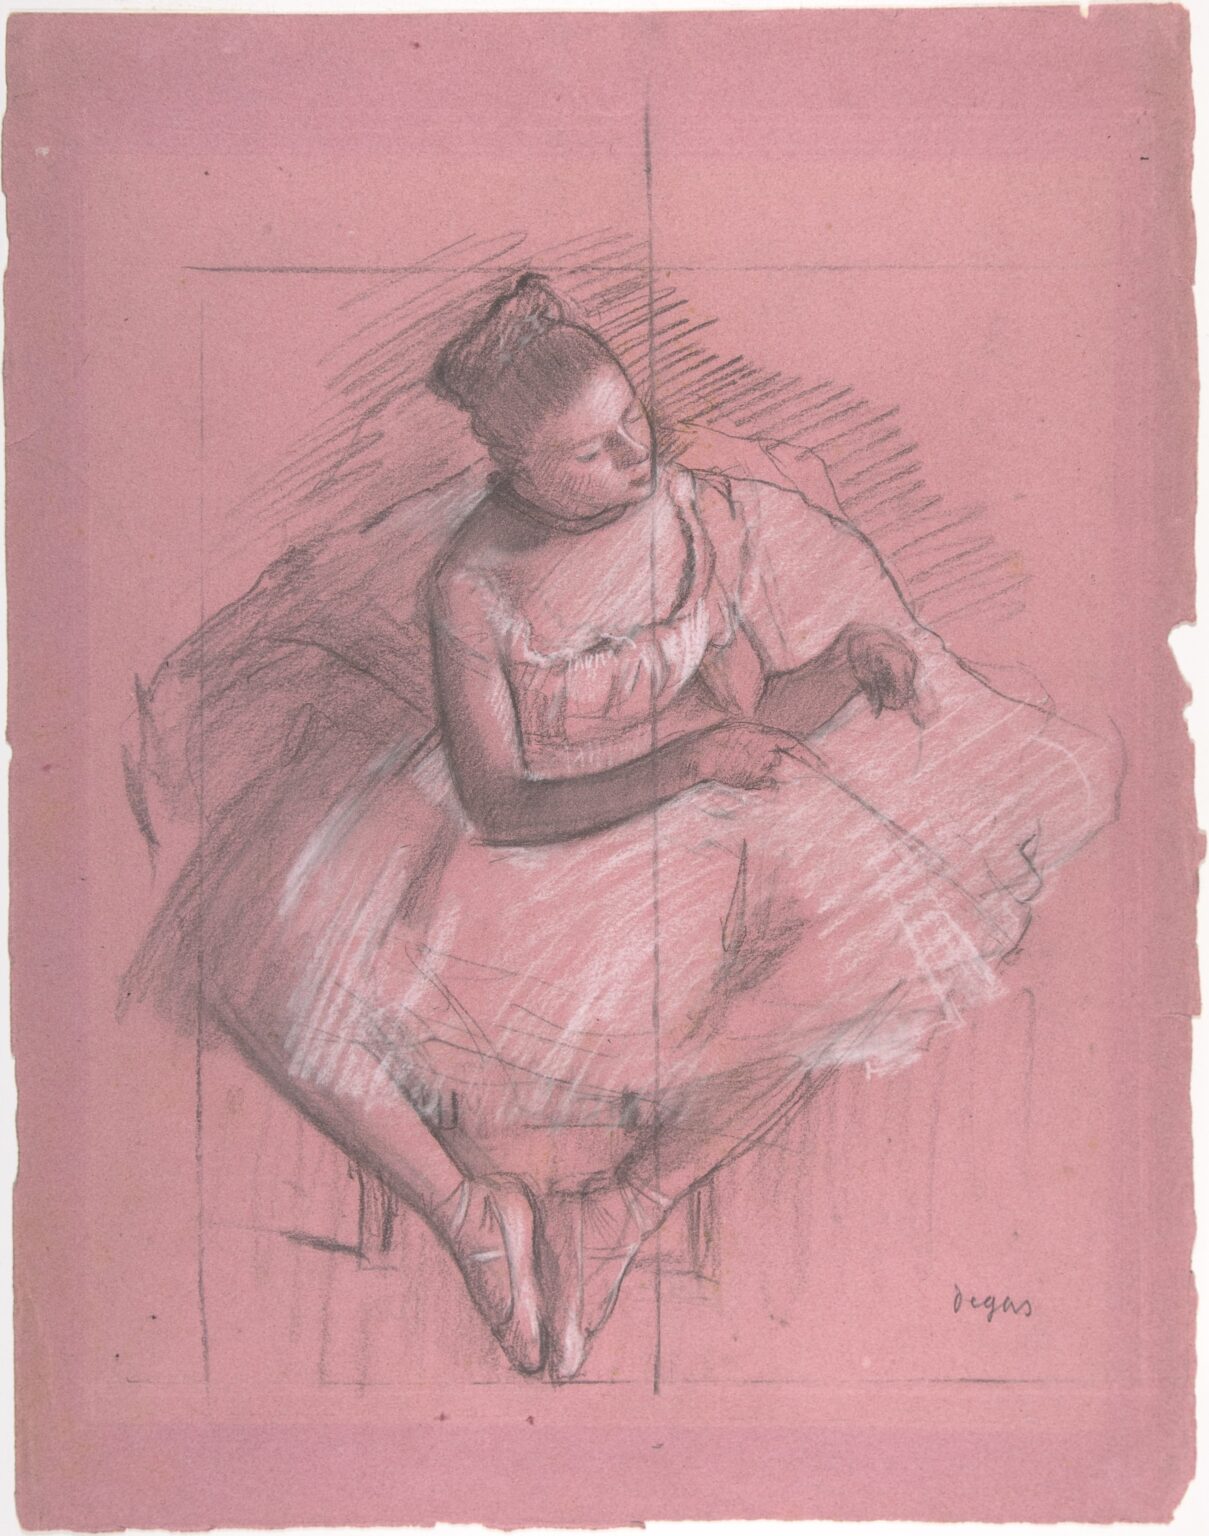
Degas never called his dancer sketches gesture drawings. The term came later. But flick through his sketchbooks and that’s exactly what they are: the same leg lifted a dozen different ways, the same tilt of a head tried and abandoned and tried again. His study for a seated dancer, squared off in blue chalk for transfer to a larger painting, still has the guideline grid showing through the pink paper underneath.
Rodin’s Cambodian studies, meanwhile, ended up scattered across French museums, unfinished and smudged and, by his own account, made in something close to a trance. As the collector Count Harry Kessler put it, they looked less like drawings of dancers and more like “pure mathematics”, movements that seemed to belong to a geometry nobody had named yet. You can see a handful of them at the Musée Rodin in Paris.
“I watched them in a kind of ecstasy… when they left, I felt as though they had carried the beauty of the world away with them,” Rodin wrote afterwards.
Neither artist was chasing a clean drawing. They were chasing the thing that moves, and that’s the only reason any of these gesture drawing tips are worth following at all. So set a timer, pick up a soft pencil, and let the first ten drawings be bad. That’s not a failure of the method. It’s the method working exactly as it should, and it’s the fastest way to stop drawing stiff, lifeless figures for good.
You do not have to wait to be found.
VISIBLE covers the part nobody teaches: how galleries, open calls, pricing, audience and money actually work, and what to do about each one. 234 pages, with twelve worksheets you fill in and use.
- 590+ artists have a copy
- Instant download, PDF and workbook
Usually

Responses