A Step-by-Step Guide to Digitising Your Artwork for High Quality Giclee Printing
A giclee print of your artwork may be something you consider doing as an artist. One of the most common methods for reproducing fine art and photography is using a giclee print.
I’ll show you how to create a giclee print from scanned artwork in this blog article. More giclee printing advice will be forthcoming, so be sure to check back!
There are a variety of approaches for digitising artwork, but I’ll focus on the two I use the most in this post. Scanning and taking pictures of the painting.

Scanning Artwork
Using a scanner to make a picture of a piece of artwork and saving it as a digital file is known as scanning it. Because it yields a high-quality image that can be easily modified, this is the method of choice for digitising artwork.
Scanner and computer software such as Photoshop or Gimp are required for a Giclee print. I use Gimp because it is free and affordable.
When scanning your artwork, you’ll need to tweak the settings on your scanner so that you’re getting a high enough quality. At least 300 dots per inch (dpi) is recommended for scanning.
Depending on the quality of your scanner and the size of your artwork, scanning may take some time. To get a high-quality scan, be patient and take your time.
Photographing Artwork
Another method is photographing artwork, but you’ll need to use a high-quality camera and minimise any glare or reflections to get the best results.
You can save your image in a variety of formats, including tiff, jpg, and png, after you have it. A lossless format like tiff should be used to avoid any loss of quality when saving.
To understand more about photographing artwork, I’ve provided a link to an article.
You are now prepared to make any necessary adjustments to the colours, contrast, and lighting in your artwork before it is printed as a Giclee!

Rectify scanned images using the appropriate software
Image editing software is the first thing you need when learning to digitise artwork for a giclee print following the scanning process. The majority of scanners come pre-loaded with basic image-editing tools.
While this software is fine for regular use, you’ll need a more advanced programme for Giclee printing picture adjustments. The quality of your artwork scan will be preserved if you use specialised software. For this, I recommend either Gimp or Adobe Photoshop.
The image can be resized and cropped as desired
Cropping and resizing the image are the following steps. When you wish to print a 5′′x7′′ version of an 8′′x10′′ piece of artwork, you’ll need to crop and scale it.
Save or export the image as a high-quality image file format such as TIFF or PNG before making the changes in Gimp or Photoshop.
This is why JPG images are wonderful for the web, but Giclee printing necessitates an image format that will not lose quality, and these tend to be huge files.
Scan files saved in TIFF or PNG format are more likely to print with accurate colours since they preserve the quality of the original scan.
To fix any colour errors, now is the moment.

Other quality issues such as correct colours, brightness, and so on
If your artwork has been digitally digitised, you’ll need to rectify any colour inaccuracies, brightness problems, or other concerns. When it comes to photo editing, nothing beats Adobe Photoshop.
What’s the purpose of your colour correction?
Giclee printing uses colour correction to produce a print that is the closest feasible match to the source artwork. The colours you see on your computer screen may appear differently when printed, so it is vital to make any required modifications before submitting the file to the printer.
What is the best method for correcting colour?
In Photoshop and Gimp, colour adjustments can be accomplished in a variety of methods. For adjusting an image’s brightness and contrast, use the Levels tool; for adjusting its colours, use the Hue/Saturation tool. To save time, I like to utilise Adobe Lightroom, which has predefined effects that I can apply to my photographs.
If necessary, adjust the contrast.
It is possible to change the contrast of an image using the Levels tool. If you’re using Photoshop or Gimp, open your image there first.
Levels dialogue box will show you a histogram of the image’s tone range in the level panel. The shadows are on the left side of the histogram, the midtones are in the middle, and the highlights are on the right side of the image.
To increase contrast, drag the black triangle on the left toward the centre of the graph until it reaches the point where the tone changes. Then, move the white triangle on the right toward the centre until the tone changes as well.
Individual colours can also be changed in the Levels dialogue box by selecting them from a drop-down list at the top of the dialogue box.

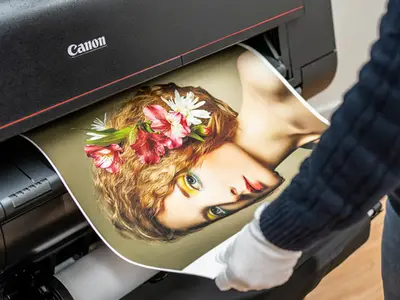
When it comes to Giclee printing, what image formats aren’t considered high-quality?
Giclee printing requires a high-quality image file, therefore JPEGs are not suitable. Because JPEGs are compressed file formats, they lose detail and quality when stored at a lower quality setting. This is why. Detail and quality have been lost in the printing process. In order to avoid this, save your scan as a TIFF or PNG file.
Always bear this in mind when preparing artwork for Giclee printing via digital means
Remember the three most important rules when learning how to digitise artwork for printing:
Scan your artwork at a high quality in order to catch all of the little details. Having a 300 dpi resolution is a desirable goal.
Colors, contrast and lighting should all be correct while scanning. If they aren’t, you can repair them using an image editing programme.
For best results, save your scan in a lossless format such as TIFF or PNG.
End of the step-by-step tutorial on how to digitise artwork for printing as a giclee print summary
As a result of the advice in this article, you can confidently digitally reproduce your artwork for Giclee printing. You may ensure that your Giclee print will be of the best quality by scanning at a high resolution and saving in a lossless format. Correcting any colour issues before printing ensures that your colours will be exactly how you want them to be.